(A picture-less post, cuz I was too busy/tired to take any!)
Okay. it's time to come clean about a secret. A big secret. A secret kept 3 long years. And my Mama always told me that the truth shall set you free. From what, I will never know.
So here it is: Stud Muffin has been working a job in California for the last (almost) 3 years. And I have been holding down the farm with only the help of my canine companions, with a visit from my husband once or twice a year. But that is all over now.
Stud Muffin is home for good!!
The back story to this is that he accepted a job that was to take only 2-3 months, but would pay very well. The months kept getting extended and here we are 2 years and 8 months later.
So, he has been driving himself and a carload of stuff back from California for the last few days and I have been madly turfing/organizing/cleaning the house, shop and garage. I've been trying to make the place pretty and tidy up all my building and crafting supplies. Not an easy task after you have junked up the place for 3 years refinishing furniture and building oddities.
But it is what it is, and I at least made room in the garage for his car! LOL
Stud Muffin (otherwise known as Bill) pulled into the drive about 3 PM yesterday, and about two hours later, Liz and Tim arrived...with a 20 foot UHaul truck.
See, on the very day that Bill returned, Liz and Tim were packing up the truck to move to Texas! The kids were able to spend the night and visit with Bill before heading out today for the big journey. Told you there were changes going on!
Phew! I'm glad I got this big secret off my chest. Now I don't have to try and remember who knows and who doesn't. At my advanced age, it's hard enough to remember what I had for breakfast, let alone something of that importance.
So, if anyone had plans to come rob the house because I was living alone on my 200 acres...you missed your chance!
Thursday, July 4, 2013
Tuesday, June 4, 2013
The accidental bench
Benches seem to be flying out of the store as fast as I can make them. When that happens, everything you see starts looking like bench material! Like the headboard and foot board from this vintage bedroom set I purchased.


And it flew away to another state!
The most recent in the bench obsession started with a score of Chevy truck body parts from the 1970s.

What sold me on the lot was the metal tailgate name plate that said Chevrolet. Wish I had the whole tailgate, but it was not meant to be!

The front grill to the left is actually from 1975, while the rest of the parts are from 1972-73. The grill to the right was broken, so I sawed it apart to make the side pieces under the arm rests.
Anyway, as soon as I loaded these parts, I knew another bench was happening. This time, the big purchase didn't make up any part of the bench structure, but was simply decorative. This meant that I had to build the entire bench from scratch, instead of just the seat. I also had to make sure that when you sat on the bench, the front grill didn't poke your back.

I found a very long counter top that had been made into the world's longest sofa table. Picture eight feet long with six legs. That became the seat portion.
After researching the truck colors of the period, many of which resembled something you might find in a dirty diaper (just sayin'), I settled on a lovely deep aqua/lagoon blue.


I fit the longest pieces back onto the bench, then cut down the grill for the arms. The front grill had the "bow tie" outline, but not the decorative emblem itself. A trip to my local Chevy dealer didn't turn up one, but they recommended my usual body shop guy. Sure enough, he had a salvaged bow tie for a repair job he did. And he gave it to me!

And then it was done! Okay, more than a miracle had to occur to get to this point, but get there I did!


Here is the side shot showing the cut-down grill under the armrests.
 The back even sports taillight covers and a TN plate from 1972!
I would like to say that I am done making benches (cuz I know you are bored with them) but I can't promise! I do have more furniture stashed away that needs my attention, but you never know....
Update: Sold in the first hour the store was open today!
Linking to:
Time Travel Thursday
Treasure Hunt Thursday

Painted baby blue when I got it, someone had tried to extend the side rails to accommodate a modern mattress. But I think they enlisted the help of an entire Kindergarden class to make the repairs because it was terrible!! Nine hundred hardware pieces and painted a completely different blue than the rest of the bed. Awful!
Anyway, since there was no salvaging the headboard and foot board for a bed, another bench was born.

And it flew away to another state!
The most recent in the bench obsession started with a score of Chevy truck body parts from the 1970s.

What sold me on the lot was the metal tailgate name plate that said Chevrolet. Wish I had the whole tailgate, but it was not meant to be!

The front grill to the left is actually from 1975, while the rest of the parts are from 1972-73. The grill to the right was broken, so I sawed it apart to make the side pieces under the arm rests.
Anyway, as soon as I loaded these parts, I knew another bench was happening. This time, the big purchase didn't make up any part of the bench structure, but was simply decorative. This meant that I had to build the entire bench from scratch, instead of just the seat. I also had to make sure that when you sat on the bench, the front grill didn't poke your back.

I found a very long counter top that had been made into the world's longest sofa table. Picture eight feet long with six legs. That became the seat portion.
After researching the truck colors of the period, many of which resembled something you might find in a dirty diaper (just sayin'), I settled on a lovely deep aqua/lagoon blue.


I fit the longest pieces back onto the bench, then cut down the grill for the arms. The front grill had the "bow tie" outline, but not the decorative emblem itself. A trip to my local Chevy dealer didn't turn up one, but they recommended my usual body shop guy. Sure enough, he had a salvaged bow tie for a repair job he did. And he gave it to me!

And then it was done! Okay, more than a miracle had to occur to get to this point, but get there I did!


Here is the side shot showing the cut-down grill under the armrests.

I would like to say that I am done making benches (cuz I know you are bored with them) but I can't promise! I do have more furniture stashed away that needs my attention, but you never know....
Update: Sold in the first hour the store was open today!
Linking to:
Time Travel Thursday
Treasure Hunt Thursday
Thursday, March 14, 2013
And yet another bed-turned-bench
With garage sale season just around the corner, I'm trying to work on projects that use what I've already stashed in the house. And garage. And shop.
This was actually the first bed I bought with the idea of making a bench.
Sometimes it just takes me a while to execute the plan. I have to circle it, stalk it, and finally attack when it's sleeping. Oops, sorry! That was chocolate! But the principle is the same. Only, I have more "will-power" when it comes to furniture.

I took my own advice from my previous experience, and painted the bench seat before assembling the bench. This is just a dry-fit in order to measure random parts to create bench arms. I also sprayed glossy white paint into the routed design, with plans to paint the rest a soft Oops green.

After digging through the scrap pile, I found some crib rails that were the right height for bench arms. In order to place the turned cross piece at the bottom, I had turned the footboard upside down, which left the thingies the wheels or feet went into showing on top.

But, I had cut off pieces to match the footboard to the seat height, so I used dowels and glue to add "finials" and cover the metal thingies (What are those called, anyway?)

Next up, rolling on paint. And painting... All. Those. Spindles.

Along difficult quick reassembly and I delivered the bench to the shop and set it on the sidewalk with a cute green toile pillow, to catch some rays!

Another project down and more stash actually used. See, kids, you don't have to call the Hoarder's show yet!
Linking up with: Transformation Thursday
My Repurposed Life
I was featured!
This was actually the first bed I bought with the idea of making a bench.

Sometimes it just takes me a while to execute the plan. I have to circle it, stalk it, and finally attack when it's sleeping. Oops, sorry! That was chocolate! But the principle is the same. Only, I have more "will-power" when it comes to furniture.

I took my own advice from my previous experience, and painted the bench seat before assembling the bench. This is just a dry-fit in order to measure random parts to create bench arms. I also sprayed glossy white paint into the routed design, with plans to paint the rest a soft Oops green.

After digging through the scrap pile, I found some crib rails that were the right height for bench arms. In order to place the turned cross piece at the bottom, I had turned the footboard upside down, which left the thingies the wheels or feet went into showing on top.

But, I had cut off pieces to match the footboard to the seat height, so I used dowels and glue to add "finials" and cover the metal thingies (What are those called, anyway?)

Next up, rolling on paint. And painting... All. Those. Spindles.

A

Another project down and more stash actually used. See, kids, you don't have to call the Hoarder's show yet!
Linking up with: Transformation Thursday
My Repurposed Life
I was featured!
Saturday, March 9, 2013
Footboard planter
Spring is coming, even if the weather can't make up it's mind about that. Is it weird that I have a fur-lined vest sitting on the back of a chair, and yet am wearing a tank top today? I think so too.
The owner of the store I sell my creations in gifted me with two twin beds that had been left out on the porch of a rental unit she owns. I brought them home and hosed them down, but when the stream of water hit the headboards, they crumbled into a pile of wet random wood. I think the backs were less like wood and more like termites holding hands. It was so gross, I didn't even take pictures of the pile since I thought I'd have to throw it all out.
Without the headboards intact, I need a way to make something from nothing but the footboards and miscellaneous pieces.
So I made a planter box. A really B.I.G. planter. We're talking over 3 feet by 2 feet. But with actual feet!

I only used parts salvaged from the beds so some sides have bullnose edges, others don't. I deliberately didn't make the box floor fit tight, so water could drain without having to drill holes. It was alright, as is, but I thought it could be better.
I saw a vintage crate on somebody's blog (I claim Old-Timers disease here) and saved an image of it. I recreated the graphic in Word and printed it out on regular paper. Using graphic paper (carbon paper to anyone over 40) I transferred the graphic outline to both long sides of the box.

I started trying to fill in the outline with paint but soon found that using a Sharpie pen work better and faster!
Okay, this is pretty good and, with a light sanding, might look like a re-purposed shipping crate, but people might not understand it. Well, if it was going to be a planter box, it might as well have leaves on it. Although, I suppose it could be a dog bed or a really short coffee table, but whatever!

Yes, that's it! I took it down to the shop and stacked another crate I built and a primitive stool in it.

The next day, I brought down some garden mushrooms I made from random glass pieces and created a grotto in the planter. If people can't figure out what it is now, I'm going to have to get a neon sign or foam fingers pointing it out!


So that is my latest something-from-nothing creation!
Linking up with Funky Junk's SNS 178
The owner of the store I sell my creations in gifted me with two twin beds that had been left out on the porch of a rental unit she owns. I brought them home and hosed them down, but when the stream of water hit the headboards, they crumbled into a pile of wet random wood. I think the backs were less like wood and more like termites holding hands. It was so gross, I didn't even take pictures of the pile since I thought I'd have to throw it all out.
Without the headboards intact, I need a way to make something from nothing but the footboards and miscellaneous pieces.
So I made a planter box. A really B.I.G. planter. We're talking over 3 feet by 2 feet. But with actual feet!

I only used parts salvaged from the beds so some sides have bullnose edges, others don't. I deliberately didn't make the box floor fit tight, so water could drain without having to drill holes. It was alright, as is, but I thought it could be better.
I saw a vintage crate on somebody's blog (I claim Old-Timers disease here) and saved an image of it. I recreated the graphic in Word and printed it out on regular paper. Using graphic paper (carbon paper to anyone over 40) I transferred the graphic outline to both long sides of the box.

I started trying to fill in the outline with paint but soon found that using a Sharpie pen work better and faster!

Okay, this is pretty good and, with a light sanding, might look like a re-purposed shipping crate, but people might not understand it. Well, if it was going to be a planter box, it might as well have leaves on it. Although, I suppose it could be a dog bed or a really short coffee table, but whatever!

Yes, that's it! I took it down to the shop and stacked another crate I built and a primitive stool in it.

The next day, I brought down some garden mushrooms I made from random glass pieces and created a grotto in the planter. If people can't figure out what it is now, I'm going to have to get a neon sign or foam fingers pointing it out!


So that is my latest something-from-nothing creation!
Linking up with Funky Junk's SNS 178
Friday, February 15, 2013
For Karen
Karen was wondering what I did with these shoe stretchers that I bought in September.


The project I mentioned working on (and hoping wouldn't be too weird!) was a photo holder.

This is the third one I have made. The first two sold pretty quickly!
I used Mod Podge to glue a vintage shoe ad to a piece of aged wood (from behind my shed) and rusted the shoe tree with vinegar and salt. I mounted the shoe tree to the wood and curled the spiral photo holders from rebar wire.
I don't know WHY I made this, but the idea wouldn't leave me alone until I did. I guess it's not too weird for other people, thank goodness!
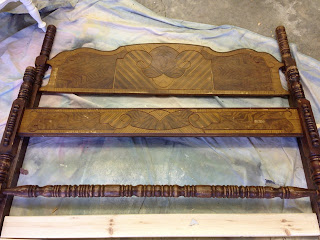
Headboard bench
Well, it may be a new year, but it's the same old me! Too busy lazy tired to keep up with the posts. My bad, sorry, and all that! Forgive me?

One of the the things I have been working on is converting random headboards into a bench. I've actually had a bed set in the garage for a while that is intended for a makeover, but was too afraid to pull the trigger on cutting the footboard in two!
Then, while out junking with LaVon, owner of the shop I sell my things in, I came upon this twin headboard:

I loved the white and yellow scheme and the cute flowers painted in the center. It just had to become a bench! A few days later, I found another, larger, headboard that had the same kind on routing detail as the first one! Of course, I forgot to take a picture of it before I chopped it up, but you can see a piece being used as an "arm" of the bench:

I framed out the seat with 2 x 4s in my garage, since the rain wouldn't go away no matter how loud I sang! (P.S. There will be no criticizing of the condition of my garage. I ain't got no time for "cleaning" my workspace!)

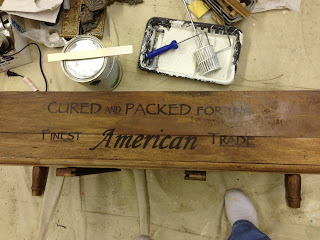
I finished the seat and filled all the endless slots and holes in the headboards. Endless, I say!

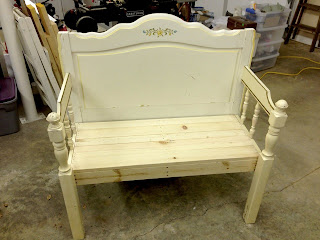
Now it was time to paint! (Doo-di-doo...waiting for a non-rainy day. )

Finally! I covered the flower detail that I wanted to keep, and went to town with the glossy spray paint. I learned something along the way: I should have painted the seat before attaching it to the back to avoid having to repaint where I over-sprayed the yellow.
Oops! Now I over-sprayed the white onto the seat! Cr*p! Get out the yellow paint again.

Finally, the majority of the painting was done, but I wanted to add back in the yellow detail in the routing.

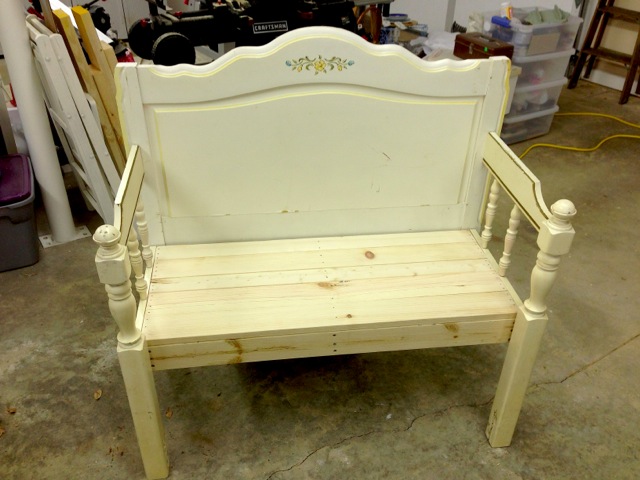
Another night in the garage, and the job was done! I hauled the sweet bench to the store yesterday, which was the first sunny day in a long while. I unloaded it from the truck and parked it in front of the shop where people could see it as the drove over the bridge.

LaVon and I fretted about where the bench would live at night, since there was no room in my booth for it. We shouldn't have worried, since it sold 5 hours after I placed it in the sunshine!
Now to make another one!
I'm linking to Transformation Thursday

One of the the things I have been working on is converting random headboards into a bench. I've actually had a bed set in the garage for a while that is intended for a makeover, but was too afraid to pull the trigger on cutting the footboard in two!
Then, while out junking with LaVon, owner of the shop I sell my things in, I came upon this twin headboard:

I loved the white and yellow scheme and the cute flowers painted in the center. It just had to become a bench! A few days later, I found another, larger, headboard that had the same kind on routing detail as the first one! Of course, I forgot to take a picture of it before I chopped it up, but you can see a piece being used as an "arm" of the bench:

I framed out the seat with 2 x 4s in my garage, since the rain wouldn't go away no matter how loud I sang! (P.S. There will be no criticizing of the condition of my garage. I ain't got no time for "cleaning" my workspace!)

I finished the seat and filled all the endless slots and holes in the headboards. Endless, I say!

Now it was time to paint! (Doo-di-doo...waiting for a non-rainy day. )

Finally! I covered the flower detail that I wanted to keep, and went to town with the glossy spray paint. I learned something along the way: I should have painted the seat before attaching it to the back to avoid having to repaint where I over-sprayed the yellow.
Oops! Now I over-sprayed the white onto the seat! Cr*p! Get out the yellow paint again.

Finally, the majority of the painting was done, but I wanted to add back in the yellow detail in the routing.

Another night in the garage, and the job was done! I hauled the sweet bench to the store yesterday, which was the first sunny day in a long while. I unloaded it from the truck and parked it in front of the shop where people could see it as the drove over the bridge.

LaVon and I fretted about where the bench would live at night, since there was no room in my booth for it. We shouldn't have worried, since it sold 5 hours after I placed it in the sunshine!
Now to make another one!
I'm linking to Transformation Thursday
Monday, December 31, 2012
Welcoming in the New Year!
In anticipation of the New Year, I've made some changes. Starting with my blog template, which had remained the same since...forever! Don't know how long I'll keep the pink, but it was nice to make a change.
I also spentall day a few hours at LaVon's, reworking my booth. I tend to think in themes, and had been collecting items for a red, white, and aqua kitchen display. After pulling down the Christmas decorations the other day, I knew it was time to put the kitchen plan into action.
This is the "before."

And the other side.

Of course, first I had to pull almost everything out and start again. I worked to find a spot for the yellow table, and as I picked it up to move it, noticed the "Sold" sign on it!

Never mind finding it a new spot! So, I'd move and set things, step back and decide to move them someplace else. This went on for some time.
I moved the round table to the center of the back wall and made the kitchen display there. I think it came out pretty good!

I think the star of the display is the bread box I painted with Miss Mustard Seed milk paint in Tricycle Red that I got from Petticoat Junktion. Before I figured out what to do with this bread box, I got carried away priming it and sprayed the inside with primer. Then I realized that maybe people wouldn't want to put food inside of a freshly painted piece. It spent the rest of the summer in the garage, until inspiration hit!

The box doesn't HAVE to be used for bread, it could be used to store/display condiments on a table or any other thing. So, I decoupaged some pages from a vintage recipe magazine that had red accents in it to the inside.
 On the outside, the original white ceramic knob and raised plaque were replaced. Thank goodness I thought to keep them "just in case!" I could have just as easily thrown them out!
The display has a variety of kitchenware, cups, canisters and bowls in my favorite color combination. I hope the customers find it refreshing too!
The rest of the merchandise was rearranged as well. I have to pay attention to the large window in my booth. As much as the natural light is wonderful, I cannot put anything that might fade near it. That includes upholstered furniture, lampshades or paper items. The price tags on the things that have been in the window have bleached out already! So it took some time to accommodate everything while protecting items from the sun.

The last two wieners are hiding under the stenciled table. The footstools are now on top of the wooden ironing board.

"Cheryl's" red Asian table (so named because she is trying to convince me to mail it to her!) stand on one of LaVon's oak side tables that really needs a white paint job. The blue accent table sits on the matching oak table.

Items were moved around on the bookcase, and the blue record table took up residence in front of the window.

Not much changed on the vanity, except I moved the lamp there after selling the original lamp that started out on the vanity.
I am now ready (okay, not really!) for the start of a new year. It will probably take me until March before I remember to write 2013 instead of 2012, but someday it will become automatic. I am hoping for a good year at LaVon's, and have a bunch of ideas rolling around in my otherwise empty head.
Here's to 2013!!
I also spent
This is the "before."

And the other side.

Of course, first I had to pull almost everything out and start again. I worked to find a spot for the yellow table, and as I picked it up to move it, noticed the "Sold" sign on it!

Never mind finding it a new spot! So, I'd move and set things, step back and decide to move them someplace else. This went on for some time.
I moved the round table to the center of the back wall and made the kitchen display there. I think it came out pretty good!

I think the star of the display is the bread box I painted with Miss Mustard Seed milk paint in Tricycle Red that I got from Petticoat Junktion. Before I figured out what to do with this bread box, I got carried away priming it and sprayed the inside with primer. Then I realized that maybe people wouldn't want to put food inside of a freshly painted piece. It spent the rest of the summer in the garage, until inspiration hit!

The box doesn't HAVE to be used for bread, it could be used to store/display condiments on a table or any other thing. So, I decoupaged some pages from a vintage recipe magazine that had red accents in it to the inside.

The display has a variety of kitchenware, cups, canisters and bowls in my favorite color combination. I hope the customers find it refreshing too!
The rest of the merchandise was rearranged as well. I have to pay attention to the large window in my booth. As much as the natural light is wonderful, I cannot put anything that might fade near it. That includes upholstered furniture, lampshades or paper items. The price tags on the things that have been in the window have bleached out already! So it took some time to accommodate everything while protecting items from the sun.

The last two wieners are hiding under the stenciled table. The footstools are now on top of the wooden ironing board.

"Cheryl's" red Asian table (so named because she is trying to convince me to mail it to her!) stand on one of LaVon's oak side tables that really needs a white paint job. The blue accent table sits on the matching oak table.

Items were moved around on the bookcase, and the blue record table took up residence in front of the window.

Not much changed on the vanity, except I moved the lamp there after selling the original lamp that started out on the vanity.
I am now ready (okay, not really!) for the start of a new year. It will probably take me until March before I remember to write 2013 instead of 2012, but someday it will become automatic. I am hoping for a good year at LaVon's, and have a bunch of ideas rolling around in my otherwise empty head.
Here's to 2013!!
Subscribe to:
Posts (Atom)